Posted on Leave a comment

Stripy Summer Crochet Bag

Stripy Crochet Summer Bag DMC Natura XL Just Cotton

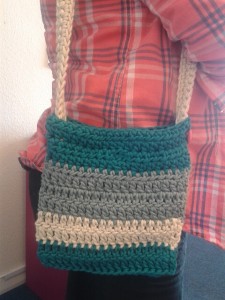
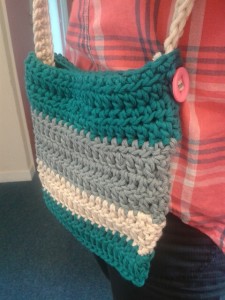
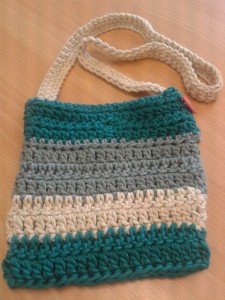
We have a new bag on the block! 

It’s our Stripy Summer Crochet Bag made with gorgeous, soft DMC Natura XL Just Cotton. 

Fancy having a small bag you can throw a couple of items in and pop out to the shops or for a drink? Then this is the bag for you!

It’s easy to make, using a size 7.0mm crochet hook, you should be able to finish the bag in 1 or 2 sittings, depending on your capability and time constraints! You can finish off you bag with any buttons and add some lining on the inside to make it more secure.  Natura XL is lovely and soft but because it’s a cotton it also has the durability and makes it perfect to make into bags!

We have a link to buy the wool and pattern here for only £15

[fusion_builder_container hundred_percent=”yes” overflow=”visible”][fusion_builder_row][fusion_builder_column type=”1_1″ background_position=”left top” background_color=”” border_size=”” border_color=”” border_style=”solid” spacing=”yes” background_image=”” background_repeat=”no-repeat” padding=”” margin_top=”0px” margin_bottom=”0px” class=”” id=”” animation_type=”” animation_speed=”0.3″ animation_direction=”left” hide_on_mobile=”no” center_content=”no” min_height=”none”]

When you have finished you bag, share it on our Facebook or Twitter, we love to see you work![/fusion_builder_column][/fusion_builder_row][/fusion_builder_container]

Posted on Leave a comment

Easy Peasy Crochet Teapot Stand and Coasters

crochet teapot stand and coasters

Easy Peasy Crochet Teapot Stand and Coasters


I crocheted this teapot stand and 8 coasters in less than an hour.

Materials

1 ball Hoooked Zpagetti and a 10mm hook.


Teapot Stand

R1        C4 then slip stitch into the first loop to form a ring.

R2        C2, then 10HT into the ring, SS into the second chain to form ring

R3        C2, *1HT into next stitch, C1.  Repeat from * to end then SS into 2nd

chain to form ring.

R4        C2, *1HT into next stitch, C1.  Repeat from * in all stitches to end then

SS into 2nd chain to form ring and finish off.

Easy peasy teapot stand and coasters


Coasters (make 8)

R1        C4 then slip stitch into the first loop to form a ring.

R2        C2, then 10HT into the ring, SS into the second chain to form ring

R3        C2, *1HT into next stitch, C1.  Repeat from * to end then SS into 2nd

chain to form ring. Finish off.

crochet teapot stand and coasters

Abbreviations

C          =          Chain

HT        =          Half Treble – loop yarn around hook, insert into stitch, pull a loop through                        (3 loops on hook), then pull another loop through all three

SS         =          Slip stitch

To download the full pattern click here Easy Peasy Crochet Teapot Stand with pic

Copyright Joy To Make

 
Follow my blog with Bloglovin

Posted on Leave a comment

Crochet poppies pattern

Crochet poppy pattern

Crochet Poppies Pattern

Crochet poppy pattern

OK so we were asked to do a few poppies, most of the ones I have seen are basically round with a hint of petal, I have done two versions one with four petals and one simpler round one both are a good size. I crocheted them in DK bright red acrylic, with a black centre in a chunky acrylic with a 4.5mm hook. So here we go…

RED POPPY WITH PETALS

R1 C3 loosely, slip stitch to form ring
R2 C2, HT 10 times into the ring
R3 C2, 1HT into same stitch, 2HT into next stitch, 1HT into next stitch. This is the base for the first petal, turn and work on this petal only.
R4 C2, HT twice into each stitch to end
R5 C2, HT twice into each stitch to end. C1 the slip stitch 3 times down the left hand side of the petal then 1 slip stitch into the next stitch on the ring.
Repeat R2 – R6 3 times more to form 4 petals around the ring.
R6 1 slip stitch into first stitch on the ring then 3 slip stitches up the right hand side of the first petal, finish off.

BLACK SPOT

C3, slip stitch to form ring, then slip stitch twice into each stitch on the outer edge of the stitches to form the
black spot, finish off and sew on the poppy.

ROUND RED POPPY

R1 Make loop, C3, slip stitch to form ring
R2 C2, HT 9 times into ring, slip stitch into 2nd chain to join the row
R3 C2, HT into same stitch, then HT twice into each stitch around the row, slip stitch into 2nd chain to
complete the row
R4 repeat R3
R5 C2, HT into same stitch, then [fusion_builder_container hundred_percent=”yes” overflow=”visible”][fusion_builder_row][fusion_builder_column type=”1_1″ background_position=”left top” background_color=”” border_size=”” border_color=”” border_style=”solid” spacing=”yes” background_image=”” background_repeat=”no-repeat” padding=”” margin_top=”0px” margin_bottom=”0px” class=”” id=”” animation_type=”” animation_speed=”0.3″ animation_direction=”left” hide_on_mobile=”no” center_content=”no” min_height=”none”][HT twice into each stitch 10 times, slip stitch into next stitch] 4 times finish
of with a slip stitch to 2nd chain of first stitch

Abbreviations::

R= Row
C= Chain – hook through loop and pull yarn through, this makes one chain
HT= Half Treble – yarn round hook insert hook under stitch, pull through loop (3 loops on hook) then pull yarn through all
three hoops.

If you would like to download the full pattern and print it please do so here poppies pdf.

Please donate to The Poppy Appeal if you are going to wear this for Remembrance Day.[/fusion_builder_column][/fusion_builder_row][/fusion_builder_container]